Good Morning to all! I don’t know if you are like me or not but I have caught the bunting/banner fever! I just adore them. I am drawn to their colors and infinite possibilities of designs for every occasion known to us and even for NO reason at all, just to make people smile! I have made some new ones for my shop but I wanted to do one that everyone could join in on and you all probably have everything you need right in your “space” (by the way my space takes up about 4-5 rooms)! Remember I am new at doing a tutorial so it is going to be far from perfect but I will get better as time goes on!
Step 1. Let’s get out our supplies

(remember this is what I used but you can use ANY size! ANY Designs….ANYTHING you have and I know it will look fab!!!)
3 inch punch…2 inch punch….1 1/2 inch punch with scalloped edges and a 1 inch punch
4 inch doilies and assorted card stock in the above sizes
1 inch digital images, there is a WEALTH of fabulous images on etsy, just check out 1 inch digital circle images and you will not believe what you will find!
1 inch wooden rounds
pretty flowers
ribbon
paint of your choosing
mod podge
paint brush
hot glue gun

Now it is time to get everything ready! First punch out all of your circles, depending how wide you want the piece that is how many you should punch.

Now you simply paint your 1 inch wooden circles in a complimentary color (the sides are really the only thing you need to paint). After they dry which is only seconds, apply a layer of mod podge on the wooden rounds and apply the digital image. You might have to burnish the sides a little bit and feel free to use your fingernail. Now put them to the side for just a moment.

Time to fold your circles. Fold each of these three sizes approximately at the 1/3 point

Assembly begins. Just take each circle and assemble putting a little tack of glue so each will hold (I couldn’t show this because I was the only one here to take the pictures but it is simple to do).

Cut your ribbon to the size that you require and then simply place the ribbon at the folds and tack with hot glue or glue of your choice.

Tack the backs with a touch of glue and viola!

Glue time again! Take your favorite flowers and place them in between each circle and now it is ready to hang!

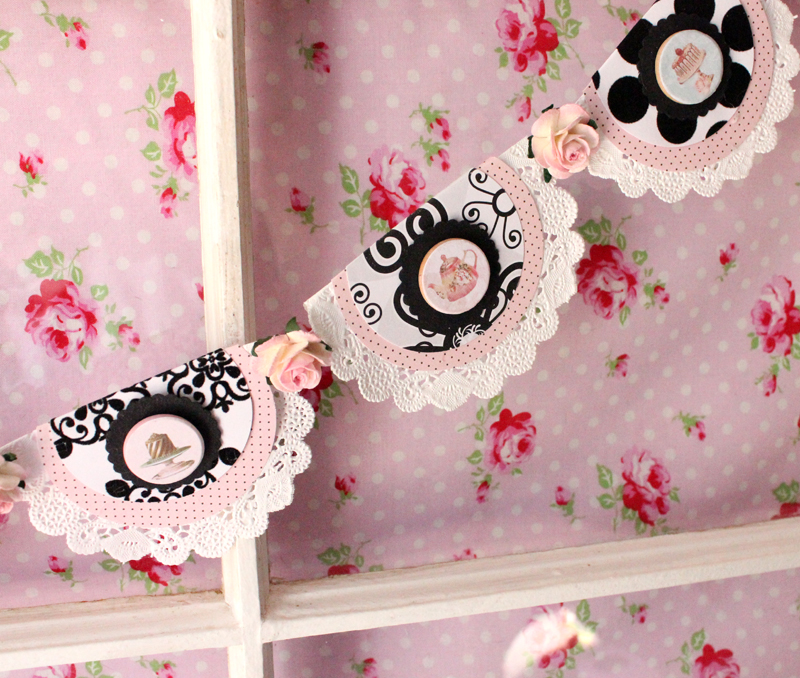
Here is another design possibility!


Hope you enjoyed this little project and I sure hope you have fun making one for yourself. I wish my pictures were better for you but believe it or not we had too much sun!
See you tomorrow and I think I will have something sweet for you!


Oh my goodness this is absolutely amazing! I’ve NEVER seen bunting like this! You should so sell it in your shop. I definitely will have to try this tutorial!
I just love banners and yours are so cute! It’s fabulous how you added the buttons and images to the centers – so dimensional and fun! They are definitely on my list to try!
I really really REALLY LOVE THIS!!!!!
I really really REALLY LOVE THIS!!!!!
I really really REALLY LOVE THIS!!!!!
I really really REALLY LOVE THIS!!!!!
I really really REALLY LOVE THIS!!!!!
Cute, cute, cute!!
The is the best tutorial yet!!! Thank you so much for showing us how to make these gorgeous garlands!
Gorgeous!!! Thanks so much for the easy peasy TUT! You did a great job!
Huggies ~
Sharron♥
These are so cute! I love the first one better. Our grand-daughter would love this for her 6th (already???) birthday! Thanks for the tut!
XoXoXo
Joy
I’m your newest follower and am putting your button on my side bar at:
http://tomorrowsmemorieskjlb.blogspot.com
Joy
They are just gorgeous, well done! I love bunting and this is such a versatile idea for parties! Thank you for sharing.
These are beautiful…will have to make these in Christmas colors to hang on my mantle for the holidays. So many good uses for these actually this could become a seasonal craft that I can change with each holiday to keep my mantles lovely year round. I must say you are so easy to follow with your step by step directions…never have a problem with what you are saying to do next. Thank you for sharing all your wonderful ideas!
Those banners are lovely indeed. The colors are well combined and saturated. I love the idea of bunting. It’s just simply amazing.
bristol banners
Those banners are lovely indeed. The colors are well combined and saturated. I love the idea of bunting. It’s just simply amazing.
bristol banners
I really admire your art skill. You should also try doing some computer related designs. Your skills in making these banners and buntings will surely make you a great graphic artist. Anyway, those banners are perfect for many occasions.
data protection