Good Morning my friends…it is mid-week and we have dare i say it…less than 3 weeks till Christmas! Unbelievable isn’t it. Hope all of you are making progress and getting closer to being almost done???? Hey…it’s nice to dream right! Well I would like to welcome you to Day 4 of Creating Christmas that I am co-hosting with the

and a band of other fabulous bloggers! check it out!
What would Christmas be without a little PINK!
Here’s a little tutorial that I wanted to share with you and I hope you are inspired to create one or something like it in the colors and style of your heart!
Pretty in Pink Birdie

you will need some modge podge…acrylic paint in the color of your choice…crystal glitter or any color glitter of your choosing…embellishments…you can use vintage buttons (they look fabulous) or any other pretties that you have in that collection of yours (you know you have one! : ) some hot glue and a wooden base or you can create these from a good heavy card stock…

This little birdie was cut from 1/4″ mdf on a scroll saw…sanded and is now ready for a new look! Like I said…you can cut any shape out of heavy card stock, or you can use balsa wood and cut with an exacto blade, foam core… and follow the same steps!

it is now time for base coating…my little birdie is going to be “pretty in pink” You can shabby the edges up a bit if you like.

now simply coat your birdie with a nice layer of modge podge and then sprinkle evenly with your glitter…wait about 20 seconds and then shake the excess glitter off into a glitter box and return the excess back into your jar.

it is time to embellish the wing…I used pretty little pink roses but like I always say…let your imagination take over and create with all the pretties you have! There is no right or wrong! The roses were applied with hot glue.

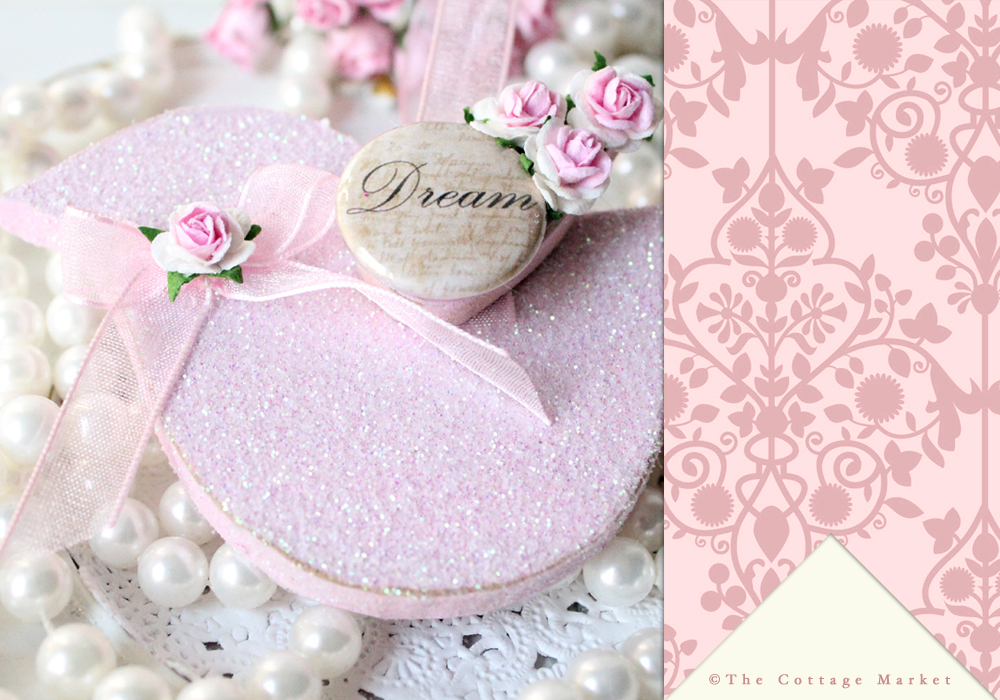
now on this one I placed a beautiful cake fit for Marie Antoinette herself! You can make these pretties by applying a pretty image to a 1 inch disc of wood or card stock…I used a flat back button.

now for the finishing touches…cut a piece of your favorite ribbon to the length you want…fold it over and glue right where you want it and then glue the embellished wing over it…tie a pretty bow with a lovely embellishment and glue it on and viola…a pretty in pink birdie that will look gorgeous on your tree and the best thing is is that you can use this all year round! My friends and family are getting these cuties on top of their presents this year…take a peek…

Dream…

Love…

Peace…
Hope you enjoyed this little tutorial and I really hope you try creating one…I truly wish I had made little elephants…there is still time but there is always next year — tell me how cute little pink elephants would be with a dimensional ear! : )
Till tomorrow…wishing you a day that Dreams are made of!
(((HUGS)))


OMG – this is beautiful! You are so creative!
Love love love love love love that birdie!!! I am totally going to make some today to gift my friends for Christmas. Can’t wait! Thanks for sharing the tutorial with us!
Mary
How sweet is that?! Love it!
So pretty!
Oh how very pretty! I’m pinning this one to my “handmade ornaments” board!
Very Sweet Andrea… It is just Adorable!!
Hi Sweetie! I just love these and I am going to have to give it a try…as always your instructions are so easy to understand and well written. Thank you for sharing. Happy Holidays to you and yours!
So sweet, Andrea! These are just darling! Thanks for the tutorial! Your friends are just going to love to see these on their gifts!! 🙂
xoxo laurie
Oh. My. Goodness. I adore this!! So very pretty!
I’m one of your fellow co-hosts and now your newest follower!
This is gorgeous!
You are one talented lady, beautifully done. Diane
Andrea my friend…
Featuring you tomorrow during Sticker Time!
So pretty!
this is so pretty, I must make one. Your is lovely, thank you for sharing xo
Featuring this at Katherines Corner tomorrow! xo
gorgeous! xoox
Aahh these are so so cute.
Happy Pink Saturday.
love
Alison
x
simply lovely!!!! thank you for share.
THis little birdie tutorial is darling – thanks so much!
Thanks you for sharing this cute little Birdie, I have to make one now, just too cute!
Have a wonderful day!
marian elizabeth
I love that ornament, it’s so cute! 🙂 Thanks for the tute!
They are gorgeous Andrea!
Thanks for linking to the Simply Christmas inspiration Party at Shabby Art Boutique.
Festive hugs ~ Kerryanne
Hi Andrea,
Just wanted to let you know you are being featured today over at Shabby Art Boutique.
Hugs ~ Kerryanne
So cute ! Thank you for sharing the tuto..;
Mirevan from Chambéry
http://www.mirevan.canalblog.com
This is so pretty..I love glitter!!
Happy Pink Saturday..xo Tami
Oh my sugar this is just gorgeous! I love it!
Big squishy hugs,
Olivia
They are so adorable
Thank you for sharing
Merry Pink Saturday
Suzann ~xoxo~
Happy Pink Satufday! Your little pink birdie is ADORABLE!!!!
What a very cute creation, Andrea, thanks for sharing it….Kathi
Stunning Thank you for sharing with us! I will be featuring them tomorrow 🙂
XO
Kristin