Farmhouse Signs: How to Make Your Own in Under 5 Minutes, that is what it is all about today! A quick and easy way to make your own Farmhouse Signs!
Hi friends, I would like to introduce you to Hannah. She is a dear dear family friend that I have had the good fortune to watch grow into a fabulous, kind, loving, compassionate, talented and simply wonderful young lady. She is now in college, working, has a Rescue Dog named Sadie (we all know how much I love that : ) and she is also trying her hand at some fun crafting projects and starting her own little business endeavor. I know how all of you love a good Farmhouse Craft… so I invited Hannah to share a project with you all today! I know you will enjoy it! Also look for a Summertime Free Printable this afternoon! Here she is…

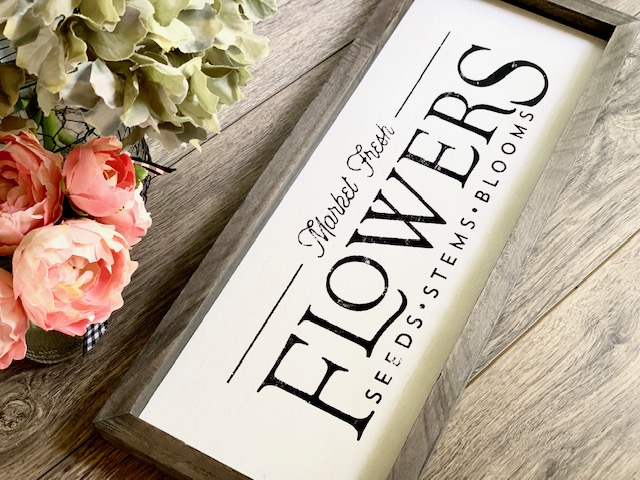
Pretty signs are a staple in almost any farmhouse style home – and especially DIY signs. From big ones to small ones – signs fit in almost any room of the house. But let’s be honest, they’re a little tricky to make sometimes and can be frustrating, too. But there’s totally an easier way. Farmhouse signs that literally takes less than 5 minutes with gorgeous results that look like something out of a high end decor shop.
Hey there, I’m Hannah with Crafting Made Easy – and I’m so, so excited to get to share my first ever YouTube video here with you guys to make this farmhouse sign! I love crafting, however whatever I make has to be super easy. Because honestly, as a college student, I don’t have a lot of time to spend on crafting – but yet I want to make pretty things that make me smile. So that’s why I prefer Crafting Made Easy 🙂
To make farmhouse signs in a snap, Chalk Couture is the easiest way to go. The project only takes 3 components (and a couple of optional ones) to make beautiful projects in minutes.
So what is Chalk Couture?
Chalk Couture is a craft line that includes Chalk Transfers, Chalkology Paste, Squeegees and optional surfaces and accessories. Each product is reusable so you can change up your decor as often as you’d like.
What are Chalk Transfers?
Unlike traditional stencils, Chalk Transfers are pre-made, adhesive backed, silk screen “transfers” that have lots of detail you just can’t replicate with craft cutter machines or traditional stencils. They work by applying them to a surface, then squeegeeing over Chalkology Paste before peeling it up to reveal the beautiful design of your farmhouse sign or decor.
What is Chalkology Paste?
Chalkology Paste is like school chalk, but in paste form that’s been pigmented with natural minerals. It is removable with plain water & a cloth, however is durable enough to hold up to water as long as no pressure is applied to remove it. However, if you’d like to make your farmhouse sign permanent, then simply give it a couple of coats of clear spray paint to seal it. Then your farmhouse signs will last for years to come. There are over three dozen colors of paste – so there’s something for every home!
Chalk Couture products all together are like creating fancy chalkboard art – yet you can use it on any hard surface for almost endless possibilities!

How to make farmhouse signs in minutes
You can find most of the supplies for this project in my Chalk Couture shop
For this project you’ll need:
- Chalk Transfer
- Black Chalkology Paste
- Squeegee
- Surface (you can totally use whatever you have or one you make – but I love this one from my shop)
- Fuzzing cloth (optional – you can use a cotton terry cloth towel instead if you’d like)
- Multi-tool (also optional – it works great for small areas but you can stir the product with a popsicle stick)
- Scissors
- Clorox Wipes for clean up
Directions:
- Preparing your transfer
- Start by cutting apart the transfer with scissors on the guidelines. The little lines on the transfer make it super easy to know exactly where to cut.
- Peel the transfer off of the backing paper, then place it onto the fuzzing cloth or terry cloth towel a couple of times to give it a light layer of lint. This “fuzzing” layer helps the transfer stick to the surface properly and not too hard. If it sticks too hard to the surface, you’ll stretch the transfer when peeling it off at the end. Then the next time you use it then it won’t perform as well and the print won’t be as clean on your farmhouse signs & decor
- Place the transfer onto the surface. While I’m using one of our box signs, you can also use painted wood, a sign from the craft store, a wooden or metal tray. Whatever surface you’d like to put the print onto will work. If you can put a sticker onto the surface and mark it with a piece of chalk, then Chalk Couture will work beautifully on that surface.
- Smooth out the transfer, making sure that there are no wrinkle or air bubbles on the “negative” areas of the transfer. You just want to ensure you have a clean adhesion to the surface so you won’t get any bleeding under the edges of the transfer.
- Creating the design
- Next, stir up your Chalkology Paste. Since Paste is made from natural pigments, it can dry up a bit over time. If paste gets too thick, it won’t go through the transfers properly. It’s easy to fix though, just add a few drops of distilled water at a time. Stir well until you get the consistency of regular yogurt and it will be good to go.
- Apply the paste to the transfer. Using a squeegee, give the entire print portion of the transfer a light layer. Then squeegee off any excess. Put all the excess back into the pot of paste because you can use it on your next project.
- Immediately peel up the transfer to reveal your gorgeous new farmhouse sign! While it will dry on its own in about 5 minutes, you can also use a blow dryer for about 30 seconds if you’re impatient (like me!)
Additional tips:
- OPTIONAL – if you’d like to make it permanent, then give it a couple of coats of clear spray paint. Don’t use brush on kind because it will smear your design. Spray only! However if you leave it temporary, you can change out your decor whenever you’d like. You can do this super quickly by applying a different transfer and you have a whole new look to your farmhouse sign!
- Clean up your transfer so you can use it on another project. Just wipe both sides really well with a Clorox wipe until all of the paste has been cleaned off. Make sure to flip it back and forth a few times to ensure you’ve gotten all of the paste out of the silk screen areas of the transfer. We also have board erasers (they work similar to those magical erasers) to make this process even easier. But it can be done with Clorox wipes just fine.
Want to see it all in action? Watch my YouTube video below to see just how easy it is:
See?!? Easy peasy! You can literally make the entire sign from start to finish in less time than it took you to read this blog post 🙂
Thank you so much to Andrea for letting me show you guys the easy way that I make farmhouse signs. If you have any questions, be sure to leave them below and I’ll help! Hopefully I’ll see you again soon with another project!
If you enjoyed this post, I’d love to see you over on YouTube – but you can also find me on Instagram & Facebook!
Stay Up to Date with The Cottage Market by Joining our Mailing List!
Come and visit out Farmhouse Gallery and ENJOY!
| Want to stay in the know? I’d really love that! (((HUGS))) |
| Like … on Facebook | Follow … on Pinterest | Follow … on Instagram | |
 |


Leave a Reply