Morning my friends. Yes it is still Meatless Monday and there will be a sweet treat below for you that can be made in a cinch!!! However today’s post is all about filling you in on
Mission: Possible…you might remember us as the Imagine the Impossibilities friends and our big celebration where 361 friends shared their creations (click here) Well we’re back…cooking up new ideas that we hope our whole blogging community will have fun with! We are so happy to be sharing them with you today!
Mission: Possible…you might remember us as the Imagine the Impossibilities friends and our big celebration where 361 friends shared their creations (click here) Well we’re back…cooking up new ideas that we hope our whole blogging community will have fun with! We are so happy to be sharing them with you today!
When I say we I mean my group of friends:
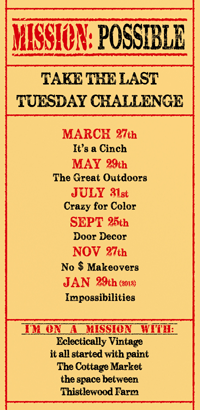
Kelly from Eclectically Vintage
Linda from it all started with paint
Karah from the space between
Kari from Thistlewood Farm
Mission: Possible
Is our new year long project and it starts with the first chapter...
It’s a Cinch – Your easy peasy tips and projects
Easy is what it is all about! You know you have those projects that won’t take too long and just haven’t had the time to create them…well now’s the time!!!
We really hope you’ll join us on March 27th for our It’s a Cinch party! More about the project at the end of this post!
Grab a button from my side bar if you would like to join in on the fun!
Grab a button from my side bar if you would like to join in on the fun!
Now resuming regular programming : )
Well my easy peasy project was something that I wanted to do for a bit…I wanted to create a very Cottage Chic Easter/Spring Rabbit but didn’t want it to be extremely…let’s say cute…I find it hard not to add tons of details to things refraining from that was a real challenge. I did however want it to have a real sweet Cottage feel and I sure hope I accomplished that. So I created a pattern, based on a vintage bunny weather vane…added a few embellishments and was done in less than 2 hours…that’s in a cinch for me for sure! Oh yes…there is a 10 minute cinch project within this larger one! So here’s the how to!
Spring Time Bunny

Let’s hop on and get the details…

we started with top of the line 1 inch pine …NO knots makes things go much quicker…traced the pattern and then Joe took it to the ban saw (I am banned from power tools…true story that I will share another time). Then I sanded her till she was smooooooooooooth!!!

3 coats of white paint was applied…the process was expedited by blow drying her in between coats…

cottage blue was the base choice! After the layers of paint were completely dry shabbying began (I don’t believe that is a word…but I know you know what I mean) all I did was do some heavy sanding on the edges… after she was distressed a bit….

she was accessorized by a bouquet of Spring flowers…all I did was take some of my favorite flowers…snip off their stem and glue them into a pretty arrangement…this took less than 10 minutes and this is something you can do with many items you all ready have…it is amazing what a litte bit of floral jewelry can do…think about it…you know you could do this and it only takes 10 minutes!!! maybe you have a little rabbit…or a big one…a bird…a bird house…the list goes on… that defines “in a cinch“

Then I took a few long strands of pretty organza ribbon…tied a bow and added a flower in the center…placed the little finial on top and garnished it with the bow…

Then she was simply assembled by placing the dowel through the drilled hole and secured in the hole on the base…

then she was ready for her debut! easy peasy…2 hours total (could be 10 minutes if you do this little technique with an existing piece:) …what do you think?
I know you have some projects that you want to do…please create and then come back here for the party on
Tuesday March 27th
I for one and I am sure my bloggy friends can’t wait to see what you’ve got!!!
I know that this is like the longest post I have done…hope you are still with me because there is a little bit more : )
It is Meatless Monday but I don’t have a big recipe for you today…I thought since we are celebrating the new
Mission: Possible debut
We could celebrate another huge event and that is the
100th Birthday of the one and only
OREO
So in the tradition of It’s a Cinch I made some chocolate dipped oreos with some sprinkles…

How simple is this…all you need is Oreo’s…sprinkles and chocolate. For these I used a pound bar of Trader Joe’s Milk Chocolate…I am also dipping another batch with TJ’s Dark chocolate…I simply chopped the entire bar up into little pieces and placed in a glass bowl…

then placed over a simmering pot of water…a make shift double boiler that works brilliantly and simply stirred till the chocolate was completely melted and silky smooth then I laid out a sheet of aluminum foil on the counter top…

then one by one…place these incredible cookies into the chocolate bath and completely cover them…let the excess chocolate drip into the bowl and then place on the foil…repeat…repeat…after every 4 I sprinkled the sprinkles on them…keep going till you are done…I got 24 cookies covered with the pound of chocolate. Now it is very important to allow them to dry…this could take up to 2 hours depending on the temperature of the home. Once they are dry…place on your plate and you are ready to party!!! These keep so well but I don’t think they will be around long at all. These two batches are going to our Vet’s office…they have been so wonderful they deserve a treat! I am sure you have a great reason to make these!

Thank you OREO’s for 100 years of yummy goodness!!!
Yes my friends…this is the post that never ends!
back to the future plans of Mission: Possible…
The last Tuesday in May we are headed to The Great Outdoors…In July it’s Crazy For Color…September…Door Decor and then in November…No $ Makeover!
Then the grand plan we will be picking right up in January with another Impossibilities Party. We thought a year was enough time to charge up for another grand project! If you want to learn more about our last Impossibilities come and check it out as 361 linked up with us and celebrated…
Imagine The Impossibilities Linky Party
We thank everyone out there for joining us and can’t wait to experience the ride with you again!
Till tomorrow my friends…
sending tons of
(((HUGS)))

