28 thrift store furniture repair, prep and makeover techniques to fix damage, refresh finishes and rescue furniture today.
Have you ever spotted a beautiful old dresser, table or chair at the thrift store and thought… I know there is a little piece of magic hiding under all of that!
Then you noticed the peeling veneer, wobbly leg, musty drawers, cracked finish or broken cane seat and quietly backed away.
Well, my friends…before you leave another potentially gorgeous piece behind, we have gathered some of the very best furniture rescuing lessons from a group of incredibly talented furniture makeover experts.
This is not simply a collection of pretty before and after pictures. Today we are going to walk through the entire process of saving thrift store furniture…from that first careful inspection to cleaning, repairing, stripping, sanding, painting, decorating and protecting the finished piece.
So grab a cup of your favorite brew…settle in…check it all out and save this guide for your next thrift store adventure. That tired little table or battered dresser may be much closer to beautiful than you think!

JOIN THE COTTAGE MARKET FAMILY
A Little Cottage Inspiration in Your Inbox
Join us for free printables, cozy decorating ideas, easy DIY projects, delicious recipes and plenty of happy inspiration!
A Quick Furniture Safety Reminder
Old furniture can come with old finishes, unfamiliar chemicals and years of dust and grime. Always work in a well ventilated area, wear the recommended gloves, eye protection and mask or respirator, and follow the directions on every product you use.
If you are working on a piece that may have been painted before 1978, test it for lead before sanding or scraping. Never mix bleach with cleaners, stripping products or other chemicals. Allow each stage to be completely cleaned, rinsed and dried according to the product directions before moving on to another treatment.
Finally, if you believe you have discovered a valuable antique, it may be best to consult a professional before removing its original finish.
Step One: Examine, Clean and Prepare the Furniture
Begin by understanding exactly what you brought home and getting every surface clean and ready.

How to Assess and Prepare Furniture Before Painting
Before we even think about choosing a paint color, we need to know exactly what we are working with. Kathy walks us through checking the drawers, veneer, joints, legs, back, hardware and overall condition of a piece before beginning. This is such a helpful starting point because a few minutes of careful inspection can prevent hours of frustration later.
Visit How to Prep and Paint Furniture at Petticoat Junktion
How to Remove Musty, Mothy and Moldy Smells from Wood Furniture
We have all opened an old dresser drawer and been greeted by that unmistakable thrift store smell! Denise shares several ways to deodorize old wood, including thorough cleaning, odor absorbing ingredients, fresh air, sunlight and sealing stubborn odors when necessary. It is an excellent reminder that painting the outside of a piece will not solve what is hiding inside.
Visit How to Remove Musty, Mothy and Moldy Smells from Wood Furniture at Salvaged InspirationsStep Two: Make the Necessary Furniture Repairs
From loose joints and broken cane to damaged veneer, these are the fixes that make the pretty part possible.

How to Repair Loose Drawer Joints and Dovetails
Loose drawer joints are very common in older dressers, but they do not necessarily mean the piece is finished. Gail demonstrates how wood glue and clamps can pull loose dovetail joints back together before any sanding or painting begins. She also shares an important lesson about examining a piece for hidden screws before reaching for the pry bar!
Visit How to Update a Dresser with Paint and Stain at My Repurposed Life
How to Repair Peeling, Chipped or Blistered Veneer
Damaged veneer is one of the biggest reasons beautiful furniture gets passed over, but Denise shows us that there are several ways to save it. Depending on the damage, loose veneer may be glued and clamped, missing areas may be filled or the damaged veneer may be removed completely. Her examples make this intimidating repair feel much more manageable.
Visit How to Fix Peeling or Chipped Veneer at Salvaged Inspirations
How to Use Bondo for Deep Furniture Repairs
When ordinary wood filler is not strong enough, Bondo may be the furniture rescuer’s secret weapon. Denise demonstrates how she uses it to fill deep scratches, gouges, missing veneer and old hardware holes before sanding everything smooth. Because Bondo hardens quickly, working in small batches is the key.
Visit Bondo for Furniture Repairs at Salvaged Inspirations
How to Fix a Broken Spindle or Furniture Leg
A cracked spindle does not have to send a dresser or table to the curb. This repair carefully removes old glue, works fresh wood glue into the crack, clamps the spindle back into position and reinforces the repair before filling and sanding. It is a wonderful little lesson in fixing the structure first and making it pretty afterward.
Visit How to Fix a Broken Spindle Leg at Salvaged Inspirations
How to Rescue a Table When the Original Top Is Beyond Repair
Sometimes the best repair is a creative replacement. Sarah and her husband rescued a small table with badly chipped veneer, failing leather and an already repaired foot. After removing the damaged materials and smoothing the top, they gave it an entirely new personality with a vintage brass tray. What a terrific reminder to look at the shape and structure of a piece instead of focusing only on its damaged surface.
Visit Repairing a Small Round Side Table at Sadie Seasongoods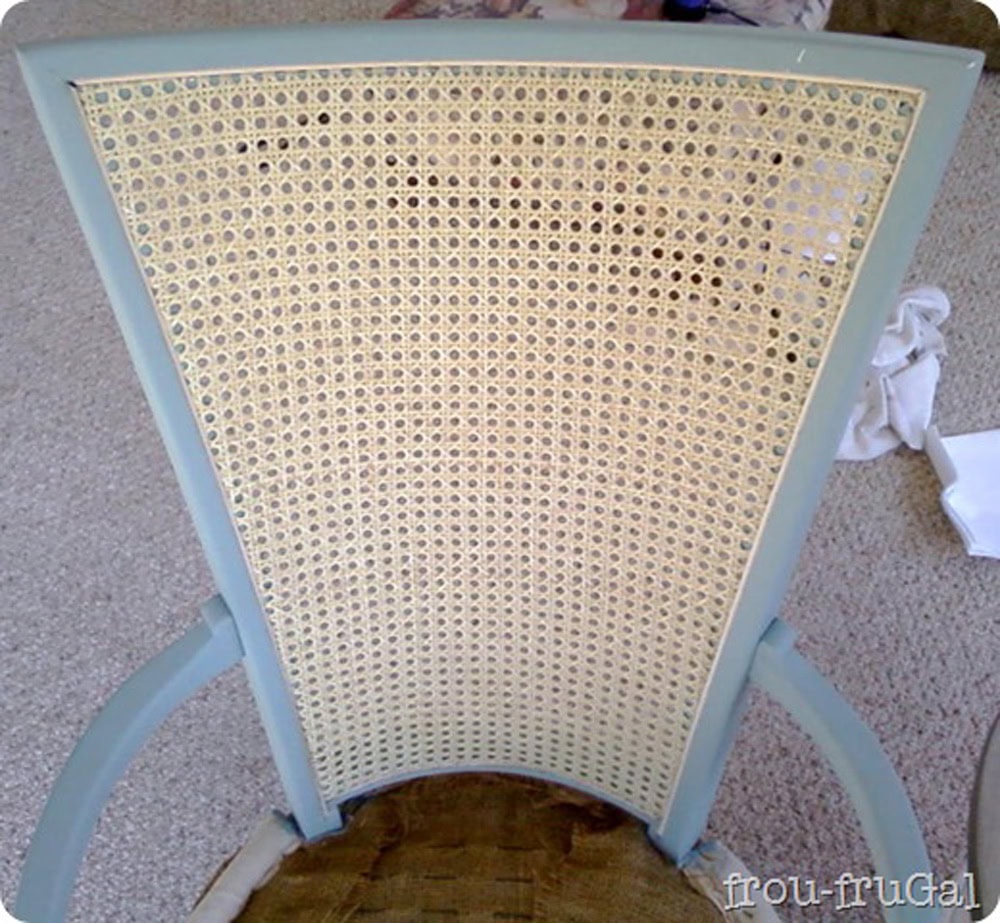
How to Replace Cane Webbing
If you have ever wondered how real sheet cane is replaced, this detailed tutorial walks through the entire process. Suesan explains how to remove the old spline and webbing, measure for new materials, soak the cane until pliable, press it into the groove and install a new spline. It takes patience, but it could save a chair that might otherwise be discarded.
Visit Replacing Cane Webbing: Removal and Installation at Frou FruGal
An Easier Alternative for a Broken Cane Seat
Not ready to learn caning? Christy offers a clever alternative by removing the broken cane, cutting a wooden seat panel and covering it with batting and beautiful fabric. Double welt cord or decorative trim hides the staples and gives the finished chair a wonderfully professional appearance. I love having both options because not every rescue needs to be complicated.
Visit Simple Fix for a Broken Cane Seat at Confessions of a Serial DIYer
How to Reupholster and Refinish a Vintage Chair
An upholstered chair can look frightening when its old padding begins disintegrating, but Pam takes hers apart and rebuilds it with fresh padding, batting, upholstery fabric and a clean dust cover underneath. She even uses the original fabric pieces as patterns for cutting the replacements. This is such a helpful example of taking plenty of photographs and preserving the old materials until the new ones are ready.
Visit Mid Century Modern Chair Restoration at House of HawthornesStep Three: Remove or Refresh the Existing Finish
Strip, sand, stain or gently revive what is already there depending on what the furniture actually needs.

How to Remove Damaged Veneer Completely
When veneer is too damaged to repair, complete removal may reveal perfectly usable wood underneath. Denise shares several methods for loosening stubborn veneer, including careful scraping, heat and moisture. The most important lesson is keeping the scraper nearly horizontal so we do not gouge the wood below.
Visit 7 Easy Tips for How to Remove Veneer at Salvaged Inspirations
How to Strip and Bleach Wood Furniture
This tutorial takes us from a dark, dated finish to the soft, natural appearance of bleached wood. Christy explains that the piece must be real wood and the old finish must be completely removed before bleaching begins. This is a more involved process, but the result can be absolutely stunning on the right thrift store find.
Visit How to Strip and Bleach Wood Furniture at Our Southern Home
How to Sand Furniture Through the Proper Grits
Sanding is not simply grabbing one piece of sandpaper and hoping for the best. Cindy explains how she starts with a medium grit to remove the old finish and follows with a finer grit to smooth the surface and eliminate swirl marks. Removing every bit of sanding dust before applying paint or stain is just as important as the sanding itself.
Visit Old Furniture Refinishing Before and After Makeovers at Reinvented Delaware
How to Remove an Old Stain Without Sanding
If the thought of sanding a large table makes you want to hide in the garage, this alternative is worth exploring. Christy demonstrates how an existing stain can be removed chemically, avoiding much of the sanding dust and physical work. As with any stripping product, good ventilation, protective equipment and careful attention to the label are essential.
Visit How to Remove Stain Without Sanding at Confessions of a Serial DIYer
How to Restore an Old Finish Without Stripping or Sanding
Not every piece needs to be taken down to bare wood. When the original finish still has some life left in it, Kathy shows how stain can refresh worn and faded areas while preserving the vintage character. This is an especially nice option when we want a gentler restoration instead of a complete transformation.
Visit How to Restore Old Wood Furniture Without Sanding and Stripping at Petticoat Junktion
How to Apply Gel Stain Over a Finished Wood Surface
Gel stain can deepen or change the tone of finished wood without completely stripping away the existing finish. Denise explains the preparation, application and drying process and reminds us that gel stain still needs a protective topcoat after it has properly cured. Always test the color and compatibility in a hidden spot before committing to the entire piece.
Visit How to Apply Gel Stain to Finished Wood at Salvaged InspirationsStep Four: Prepare and Paint Difficult Furniture Surfaces
Laminate, gloss, bleed through and brush marks all become much easier when the preparation is right.
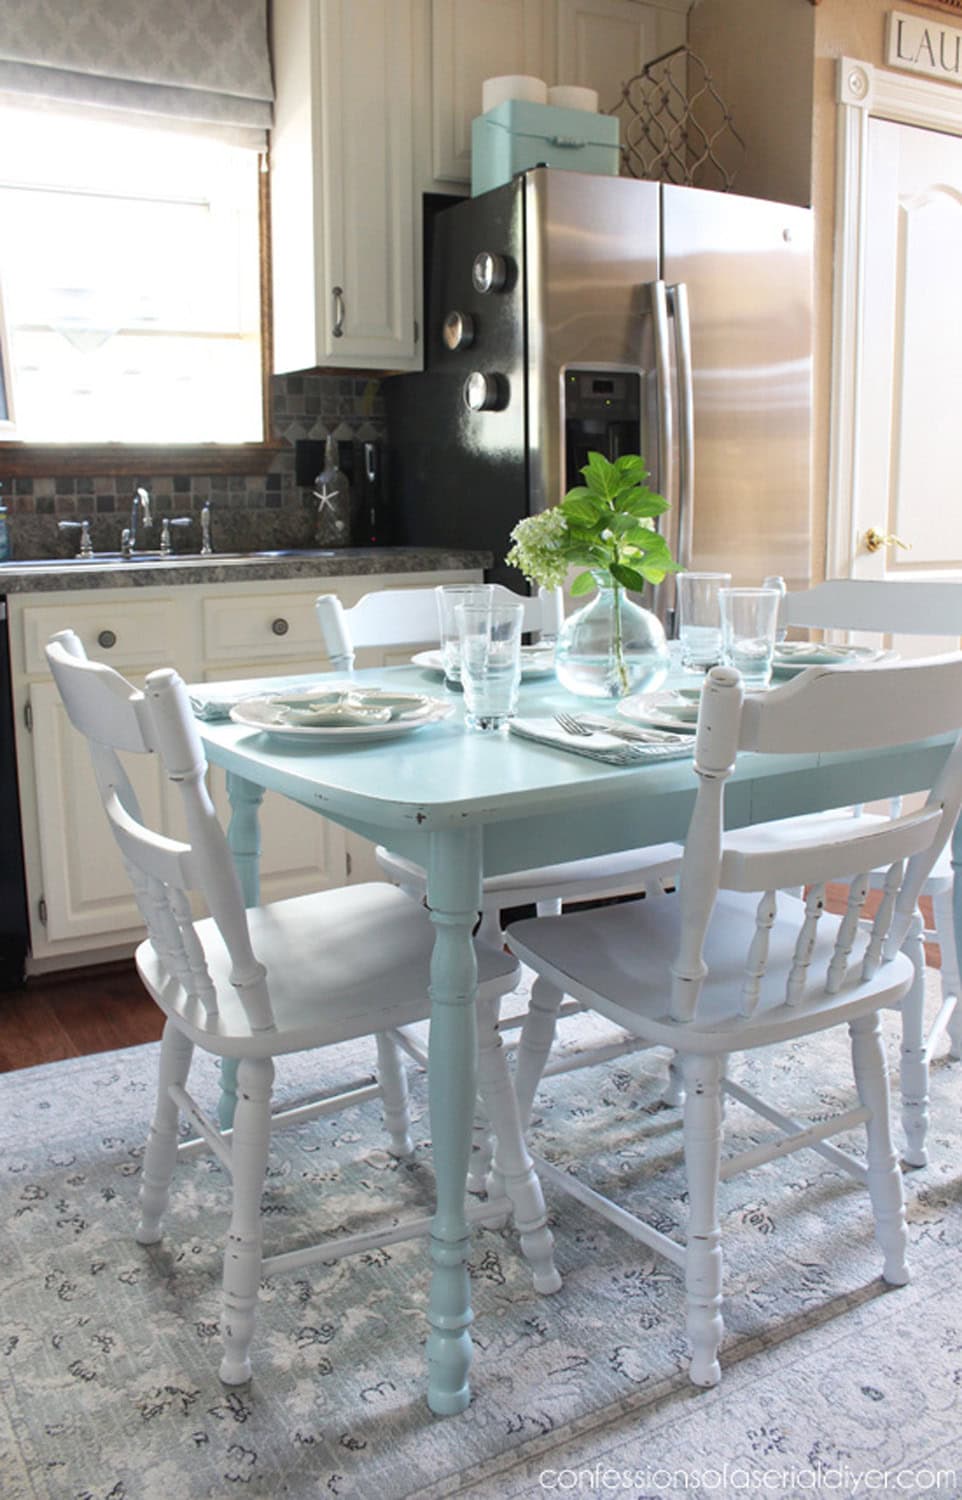
How to Paint Laminate Furniture
Laminate can absolutely be painted, but it needs the proper preparation if we expect that beautiful new finish to stay put. Christy lightly sands the slick surface to give the primer something to grip, removes every speck of dust and builds the new finish with carefully applied coats. This is a perfect tutorial to remember when a bargain piece is not made from solid wood.
Visit How to Paint a Laminate Kitchen Table at Confessions of a Serial DIYer
How to Paint Over High Gloss Furniture
A shiny factory finish is another surface that can cause peeling paint if we rush the prep work. Denise explains that a good scuff sanding dulls the shine and a quality bonding primer creates the foundation for the new paint. Once that slick surface has been prepared correctly, we have many more paint options available.
Visit Painting Over High Gloss Furniture at Salvaged Inspirations
How to Stop Stains and Wood Tannins from Bleeding Through Paint
There are few things more frustrating than watching mysterious pink, yellow or brown stains appear through freshly painted furniture. Denise explains why old stains and wood tannins can bleed through and compares products used to block them. This is especially important when painting mahogany, cherry or other reddish woods with a light color.
Visit Stain Block and Stop Bleed Through When Painting Furniture at Salvaged Inspirations
How to Paint Furniture with Chalk Paint from Start to Finish
Christy gives us a complete beginner friendly chalk painting lesson, from selecting a quality brush and preparing the furniture to applying paint and protecting the finished surface. She also explains when sanding may still be helpful, despite the popular idea that chalk paint never requires preparation. This is one of those wonderfully thorough tutorials to keep nearby during an entire makeover.
Visit How to Paint Furniture Using Chalk Paint at Confessions of a Serial DIYer
How to Spray Paint Furniture
Spray paint is especially helpful on chairs, small tables and furniture with spindles or intricate areas that would be tedious to brush. Kathy shares a collection of makeovers along with helpful advice about ventilation, weather, testing the spray pattern and applying light coats. Several thin coats will always give us better results than one heavy, drippy coat.
Visit Yes You Can Spray Paint Furniture at Petticoat Junktion
How to Get a Smooth Painted Finish Without Brush Marks
If visible brush marks drive you a little bit crazy, Denise’s brush and roll method may become your new favorite technique. Paint is first applied with a brush so it reaches corners and details, then lightly rolled while it is still wet to smooth the surface. The result can look remarkably similar to a sprayed finish without needing a paint sprayer.
Visit Brush and Roll for a Smooth Finish at Salvaged InspirationsStep Five: Add Age, Character and Decorative Details
Once the furniture is sound, this is where distressing, glaze, gilding, transfers and decoupage can bring it to life.

How to Distress Painted Furniture Naturally
Good distressing should look as though it happened naturally over many years. Kathy shares tips for choosing the right sandpaper, controlling how much paint is removed and concentrating wear around edges, corners, knobs and other places hands would normally touch. The biggest secret may simply be knowing when to stop!
Visit Tips for Distressing Painted Furniture and Home Decor at Petticoat Junktion
How to Use Glaze on Painted Furniture
Glaze settles into carvings, corners and details to create depth and an aged appearance, but it can also become overpowering quickly. Jen shares both her process and the lessons she learned when the first result was more heavily distressed than she wanted. I especially appreciate a tutorial that shows us how to change direction when the finish in our imagination is not quite what appears on the furniture!
Visit Glazing Furniture: Lessons Learned at Girl in the Garage
How to Use Gilding Wax and Gold Leaf
A little shimmer can highlight carved details and turn an ordinary painted piece into something truly special. Denise explains the differences between gilding wax and gold leaf, how each is applied and when the finished embellishment should be sealed. Whether we want one quiet golden edge or a dramatically glamorous finish, this guide gives us a wonderful place to begin.
Visit A Beginner’s Guide to Gilding Wax and Gold Leaf at Salvaged Inspirations
How to Apply Rub On Furniture Transfers
Furniture transfers allow us to add florals, typography and intricate artwork without painting every detail by hand. Denise shows how to plan the placement, keep the design from shifting and burnish it carefully onto the painted surface. Take your time, lift the carrier sheet slowly and check that every portion has transferred before removing it completely.
Visit How to Apply Furniture Transfers at Salvaged Inspirations
How to Decoupage Furniture
Decoupage paper, tissue, napkins and even beautiful rice paper can completely change a plain piece of furniture. Denise walks us through removing dated details, filling and sanding the surface, priming, painting and blending the decorative paper into the surrounding finish. It is also a budget friendly alternative when a large furniture transfer is not in the budget.
Visit How to Decoupage Furniture at Salvaged InspirationsStep Six: Protect the Finished Furniture
The final step is choosing protection that makes sense for how the rescued piece will actually be used.

Should You Finish Painted Furniture with Wax or Poly?
Choosing the proper protective finish depends on how the furniture will be used. Wax gives lower traffic pieces a beautiful soft finish and is easy to refresh, while a water based polyurethane generally offers stronger protection against spills, scratches and everyday use. Denise compares the benefits of both so we can choose a finish based on the piece instead of automatically reaching for the same product every time.
Visit Painted Furniture: Should I Wax or Poly? at Salvaged InspirationsAndrea’s Quick Thrift Store Furniture Rescue Checklist
Before bringing home your next furniture project, take a few quiet minutes to look it over from top to bottom.
- Check the structure. Gently test the legs, joints, back, shelves and top for movement.
- Open every door and drawer. Make sure they fit, slide and close properly.
- Look underneath. The underside often reveals broken supports, water damage, insects or previous repairs.
- Identify the surface. Determine whether you are looking at solid wood, veneer, laminate, metal or a combination of materials.
- Inspect the veneer. Small chips and loose edges can usually be repaired. Widespread bubbling or missing veneer will require more work.
- Use your nose. Strong smoke, mildew or pet odors may require extensive cleaning and sealing.
- Check for moisture damage. Swollen particleboard and deeply rotted wood can be more difficult to save than a stained or scratched surface.
- Look for missing pieces. One missing knob is easy to solve. Missing drawers, trim or structural parts may require creative rebuilding.
- Consider the final cost. Add the price of repair supplies, primer, paint, hardware and protective finish before deciding whether the piece is truly a bargain.
- Be honest about the work. A challenging rescue can be incredibly rewarding, but it is perfectly acceptable to leave behind a piece that is unsafe or more work than you want to take on.
- Take photographs before disassembly. Those pictures will be tremendously helpful when it is time to put hinges, hardware, drawers and decorative pieces back where they belong.
- Label everything. Number the drawers, place screws in labeled bags and keep the hardware with the furniture.
- Do the repairs before the pretty part. Cleaning, gluing, clamping, filling and sanding are not glamorous, but they create the foundation for a makeover that will last.
- Test products in a hidden area. Wood, old finishes and furniture materials can react differently. A small test can prevent a very large problem.
- Respect drying and curing times. Paint or sealer may feel dry within hours, but it can take several weeks to reach its full hardness. Treat the finished piece gently while it cures.
Look at That Furniture One More Time
The next time you see a scratched table, a dresser with peeling veneer or a sweet chair with a broken seat…look at it one more time before walking away.
Try to see the lines, the shape, the craftsmanship and the useful years that may still be hiding underneath the damage.
Not every piece should come home with us…believe me, our garages would never forgive us! But so many pieces that appear hopeless simply need a good cleaning, one solid repair and a little bit of imagination.
I hope these wonderful furniture experts have given you the confidence to try something new. Start with a small table or an inexpensive chair, take your time and remember that even the experts occasionally change their plans halfway through a makeover.
That is not failure, my friends…that is simply part of rescuing something old and helping it become beautiful again.
Happy Thrifting and Happy Creating!
Keep the Inspiration Going
Explore More Crafts, Cozy Roundups and Creative Ideas
There is always something new to discover here at The Cottage Market! Browse easy crafts, clever DIY projects, inspiring makeovers, cozy decorating ideas, helpful tips, delicious vegetarian recipes and all of our newest weekly roundups.
Browse DIY and Craft Ideas Explore All RoundupsVisit Your Favorite Cottage Market Corners
Do Not Miss the Freebies
More Than 4,000 Free Printables Are Waiting for You!
Print a little happiness for your home! Explore free wall art, planners, recipe cards, banners, seasonal favorites, digital papers and so much more. New printables are added regularly, so there is always something lovely waiting to be discovered.
 Browse All Free Printables See Today’s Free Printable
New crafts, roundups, makeovers, recipes, helpful ideas and free printables are added every week… so be sure to come back and visit again soon!


Leave a Reply